
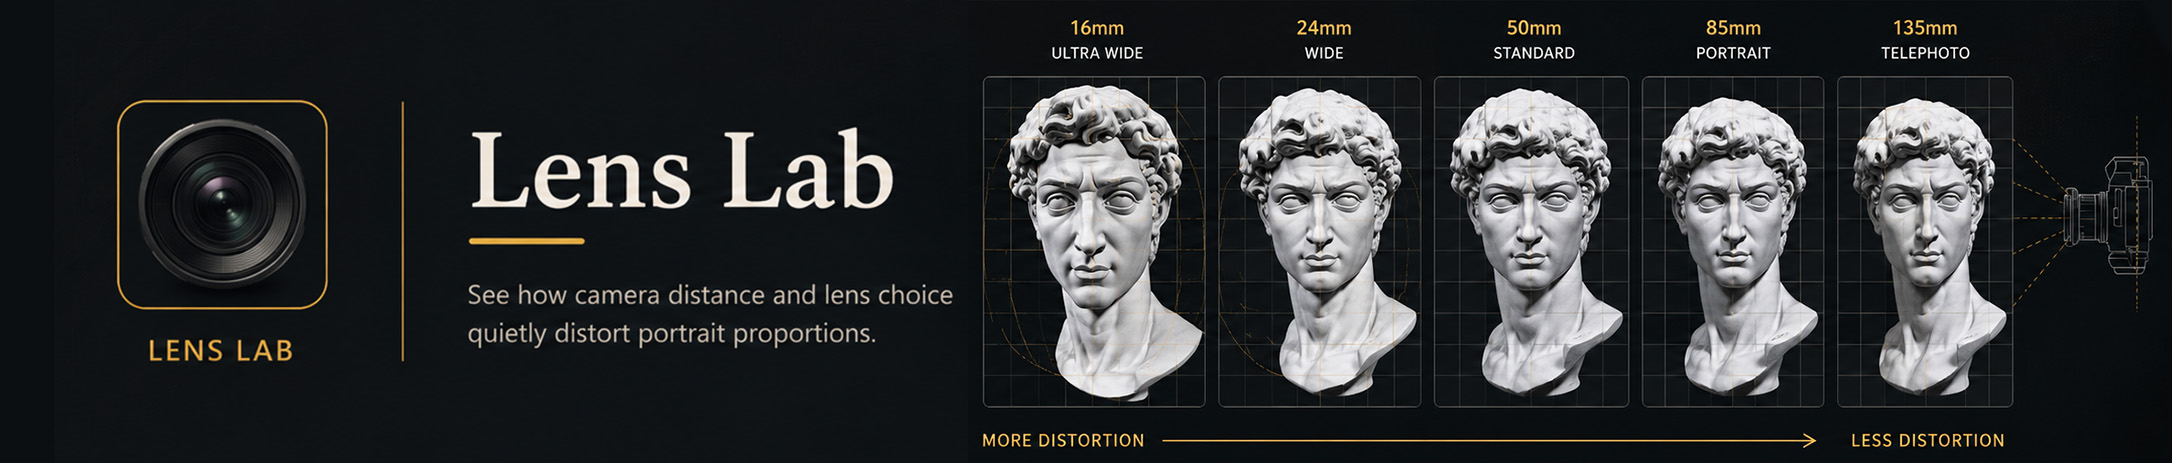
Lens Lab
See how camera distance and lens choice can quietly distort portrait proportions.
Find portrait references at this angle
Rotate David, then search the rights-filtered index. Matches are approximate to David’s selected head angle. As time allows, portraits are human-reviewed to make the guide as accurate and useful as possible.
🔒 Free preview shows one matching reference. Full Lab unlocks the complete result set and page controls.
Licence metadata is recorded from Wikimedia Commons, but users should open the source page and verify the current rights information before publishing or commercial reuse.
Lens & Reference Guide – Understanding Viewpoint, Distance and Distortion
A photographic reference is not a neutral copy of what the eye sees. The camera records the subject from one fixed viewpoint, and the relationship between the camera, the subject and the lens can change how proportions appear.
For an artist, understanding those changes helps you recognise when a photograph is describing the subject naturally and when the reference itself may be exaggerating or compressing what you see.
Viewpoint Comes First
The most important factor in perspective distortion is the position of the camera in relation to the subject.
Move the camera closer and differences in distance between the near and far parts of the subject become more noticeable. Move farther away and those differences appear less pronounced.
This is why a face photographed very close to the camera can look dramatically different from the same face photographed from farther away.
Camera Distance and Facial Proportion
A face has real depth. The nose sits closer to the camera than the ears, and the front of the face sits closer than the sides and back of the head.
At a short camera distance, these relatively small differences become significant. Features nearer the camera can appear larger while features farther away appear smaller.
For portrait artists, this can affect the apparent size of the nose, the width of the face, the position of the ears and the overall relationship between the front and sides of the head.
Focal Length
Focal length changes how much of the scene the camera records and therefore influences the camera distance normally used to frame a subject.
A wide-angle lens usually requires you to move closer to fill the frame with a head or figure. A longer lens allows you to move farther away while keeping a similar composition.
It is primarily that change in viewpoint and camera distance that produces the familiar difference between a close wide-angle portrait and a more distant portrait made with a longer lens.
The Head Is Not Changing
The physical proportions of the subject remain the same. What changes is the viewpoint from which those proportions are projected onto the photograph.
This is an important distinction for drawing. A photograph may be internally consistent while still presenting proportions very differently from how you would experience the same person at a more natural viewing distance.
Wide-Angle References
Wide-angle lenses can be useful, but close camera positions can exaggerate depth.
Features nearest the lens may appear larger while the sides of the head, ears and other more distant forms appear to recede more quickly.
This is not necessarily an error. It can be used deliberately for expressive effect. The important thing is recognising that the appearance is partly a consequence of viewpoint.
Longer Lenses and Distance
Longer focal lengths are commonly used for portrait photography because they allow the photographer to work from farther away.
From that greater distance, the relative distance between the nose, eyes, ears and back of the head becomes smaller in comparison with the total camera distance. The resulting proportions often feel more natural for portrait reference.
This does not mean that one focal length is universally correct. The appropriate choice depends on the viewpoint and the visual effect you want.
Perspective Compression
Photographers often describe longer lenses as “compressing” space.
What you are really seeing is the effect of photographing from farther away. Near and distant forms become more similar in apparent size, making the depth between them seem reduced.
Understanding this distinction helps separate the effect of the lens itself from the effect of where the camera is positioned.
Framing and Cropping
Two photographs can show the subject at the same final size while having been made from very different distances.
A wider photograph can be taken from farther away and cropped afterwards, producing a different perspective from a photograph made close to the subject even if both final images show the head at the same size.
This is why focal length alone does not tell you everything about a photographic reference.
Head Angle and Viewpoint
The angle of the head also changes the proportions you see.
As the head turns, tilts or moves above or below your eye level, features overlap and change position. The far side becomes less visible, nearer forms become more dominant and the planes of the head reveal themselves differently.
These changes come from perspective and orientation rather than from changes in the anatomy itself.
Lens Distortion
Lenses can also introduce optical distortion, particularly towards the edges of an image.
Barrel distortion can make straight lines bow outward, while pincushion distortion can bend them inward. Modern cameras and editing software often correct much of this automatically, but some distortion may remain.
For most drawing references, perspective caused by camera position is usually more important than small optical imperfections in the lens.
Photographs and Human Vision
The human eye and a camera do not experience a scene in exactly the same way.
We constantly move our eyes and head, shift our attention and combine information from slightly different viewpoints. A photograph freezes one viewpoint, one instant and one projection of the subject.
This does not make photographs poor references. It simply means that understanding how they were made helps you interpret them more intelligently.
Choosing Reference for Drawing
There is no single “correct” lens for every piece of artwork.
A natural-looking portrait reference may benefit from a moderate camera distance and a longer portrait lens. A dramatic close-up may deliberately use stronger perspective. Environmental portraits may need a wider field of view to include the surrounding space.
The important question is whether the photographic perspective supports the drawing you want to make.
Using Distortion Creatively
Not every distortion needs correcting.
Exaggerated perspective can create energy, intimacy, scale or drama. A hand reaching towards the viewer, a face seen from very close range or a figure photographed from below can all use perspective deliberately as part of the image.
Understanding the underlying optics gives you the choice to preserve, reduce or exaggerate those effects rather than accepting them unknowingly.
From Reference to Drawing
A photographic reference should inform your drawing rather than dictate every decision.
Look at the relationships within the image, consider the viewpoint and ask whether the proportions are being affected by camera distance, head angle, lens choice or cropping.
The goal is not to remove the character of photography. It is to understand what the camera is showing you so you can decide how much of it belongs in your artwork.
Learning to See the Camera
With practice, you begin to recognise the visual clues of different viewpoints without needing to know exactly which lens was used.
You may notice an enlarged foreground feature, ears disappearing behind the sides of a head, unusually rapid changes in scale or the flatter relationships produced by a more distant viewpoint.
The aim is not to become a camera technician. It is to become better at recognising how a photographic reference has translated three-dimensional form into a two-dimensional image.
Lab note: Lens examples simplify photographic behaviour and individual cameras, lenses, sensors and correction software may produce different results. Use the Lab to understand the visual relationships rather than treating a particular focal length as a rigid rule.
Teaching point The head is not changing. Only the camera is. Close wide-angle reference can exaggerate nearer forms - especially the nose, mouth, brow and chin - while visually pushing the ears and sides of the head backward. For portrait drawing reference, a longer lens used farther away usually gives a more natural look.
Using catalogue references in your own artwork
This rights-filtered catalogue currently contains 1,600 approved references. The numbers update automatically when the catalogue grows.
Head-angle checks: 12 human-reviewed; 1,588 estimated or not yet human-reviewed. A rights check is not a head-angle accuracy check.
| Licence | Images | What it means for your art |
|---|---|---|
| Public Domain Mark 1.0 | 1,298 | You may draw, paint, adapt and sell work made from it. Credit is recommended; still check the source page for other rights. |
| CC0 1.0 | 78 | You may draw, paint, adapt and sell work made from it. Credit is optional, but good studio practice. |
| CC BY 4.0 | 141 | You may draw, paint, adapt and sell work made from it. Give the source a reasonable credit, link this licence and say that you made artwork from it. |
| CC BY 3.0 | 19 | You may draw, paint, adapt and sell work made from it. Give the source a reasonable credit, link this licence and say that you made artwork from it. |
| CC BY 2.5 | 2 | You may draw, paint, adapt and sell work made from it. Give the source a reasonable credit, link this licence and say that you made artwork from it. |
| CC BY 2.0 | 62 | You may draw, paint, adapt and sell work made from it. Give the source a reasonable credit, link this licence and say that you made artwork from it. |
What this means in practice
Every reference in this catalogue may be used to sketch, draw or paint from. You may share or sell your finished artwork. Your own creative contribution remains your work: a CC BY source does not require you to give your finished painting away or license it under Creative Commons.
- Public Domain Mark and CC0: you can make and sell artwork based on these images. Credit is not normally required, but keeping a source note is good professional practice.
- CC BY: you can make and sell artwork based on these images, but include a reasonable source credit wherever the work is shown or sold.
- Closer copies: if the finished artwork clearly carries over the photograph's composition, crop, lighting or distinctive arrangement, call it a source-based work and include the credit.
Credit format for CC BY: Reference image: Title, by Creator, via Wikimedia Commons, CC BY 4.0. Painting by Your Name. Put this in a product listing, exhibition caption, book credit or online post—not necessarily on the painting itself. Before selling: open the individual Wikimedia source page and double-check its current licence, attribution and any stated restrictions. This table is practical guidance, not legal advice; privacy, publicity, trademark and moral rights can still matter.
Explore the Lens Lab Preview
Try a selection of the Lab’s tools and exercises before unlocking complete access.
Selected focal-length examples and comparison controls.
Some advanced features, exercises and references remain locked.
Preview access only.
Independent preview; Academy lessons, exercises and forums are not included.
All Labs are also included with an active KN Creative Academy membership.
ONELAB29All Labs offerALLLABS75